


Note: not working for globe as of Apr.7,2011
Using Ultrasurf
(configure first your dashbord/modem)

Mirror 1 >>> Ultrasurf
Mirror 2 >>> Ultrasurf
Mirror 3 >>> Ultrasurf
2.) Open it, the file was zipped, extract it using winzip, etc.
I recommend put it on your desktop. Just put the zipped file to your desktop then right click it and select extract here.
Image 1


3.) After extracting, run the ultrasurf
Image 2

4.) Click Options
Image 3

5.) Copy the check/uncheck option like in the image below then click Proxy Settings.
Select Manual Proxy Setting then input your working proxy and port. (The image proxy and port below are for globe)
Image 4

(Working Proxy and Port for Ultrasurf)
-For SMART-
Proxy: 10.102.61.46
Port: 8080
-For GLOBE-
Proxy: 203.177.42.214 port 8080(100% working)
192.40.100.20 port 8080(100% working)
Other working proxies:
203.177.91.131:80
202.149.67.82:8080
118.97.234.253:8080
119.252.162.120:8080
202.51.107.34:8080
222.124.213.118:8080
210.23.77.200:8080
125.162.242.160:8080
201.18.15.11:8080
192.40.100.20:8080
6.) Click retry or restart your ultrasurf.
Wait for the status: Successfully Connected to Server!
Image 5

You must have configured your dashboard/modem first and has an active connection of it.
-enjoy free browsing!
If your connection is slow, try changing fast proxy and port.
-Configuring the Dashboard/Modem-
-for globe-
1.) Tools > Options
Image 6

2.) Profile Management > New
Image 7

3.) Profile Name: anyname (e.g.Ultrasurf)
Select Static. APN: http://www.globe.com.ph/
Access number: *99***1# , Save then Ok
Image 8

4.) Select your new profile (ultrasurf) then connect.
Image 9

-for smart-
(note: Dont use Smartbro sim. Use only Smart Buddy or Talk n Text Sim.)
1.) Settings > Network Settings > Config file
Image 10

2.) Click Add
Image 11

3.) Follow the settings below,
(filename, dial number and APN), click ok.
Image 12

4.) Choose the profile name you have made then
Set Default, then use it to connect.
Image 13

-CONFIGURING BROWSERS-
-FIREFOX-
CLICK TOOLS>OPTIONS>ADVANCED>NETWORK>SETTINGS>
MANUAL PROXY CONFIGURATION>COPY THE SETTINGS BELOW,CHECK Use this proxy server for all protocols>ok.
(If you have load balance, just use No proxy.)
Reload the page.
Image 14

-for google chrome-
1.) follow the image below
Image 15

2.) follow the image below
Image 16

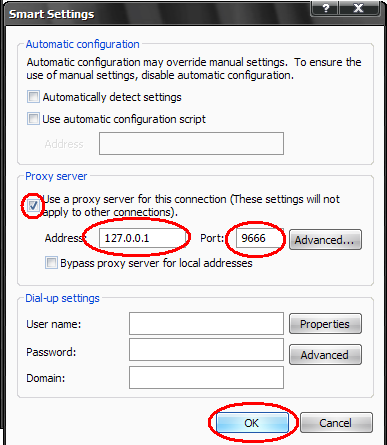
Image 17

4.)Copy the settings below then click ok.
Image 18
Video Tutorial
3.) Choose your profile whether you are globe or smart.


0 comments:
Post a Comment